Epoxy Fillets
By John Brohm – NAR #78048
|
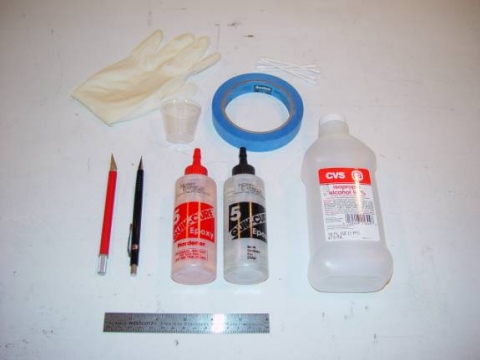
One of the most pleasing things about a well finished rocket, besides the paint job, is the smooth contours and seamless transitions between the different parts. This smooth, flowing, aerodynamic look can make a rocket look fast just sitting on the pad, and imparts its own sense of beauty in the model. Building up good, smooth fillets are central to achieving this look, and this article provides a short overview on how to create them. The method outlined here works well for BT-60 size to mid power sized rockets, although it can be successfully applied to smaller rockets if one desires. Photo 1 shows the tools you’ll need.
The subject in this article is my LOC/Precision Onyx, and
I’ll be making fillets that are 3/16” wide at the base. You’ll need a stand to
lay your rocket on so that you have good working access, and use of both hands.
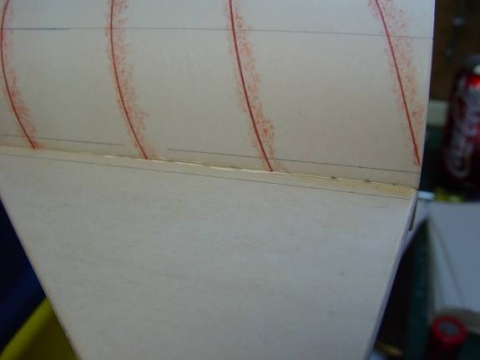
Start by laying out the boundaries for your fillets. In my case, I made marks
3/16” from the base of the fin and body tube and connected the dots. Photo 2
illustrates the fillet layout for my Onyx.
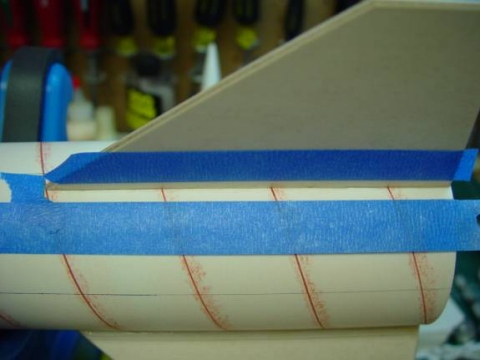
Next, place strips of masking tape along the lines you just drew. Remember to dam up the front of the fillet at the point where the fin meets the body tube. This dam will be important to control the epoxy flow at the joint. Photo 3 shows the tape up for the Onyx.
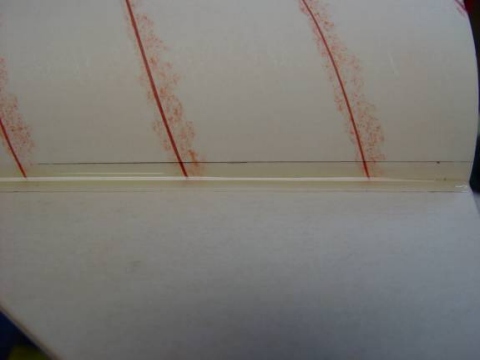
Pour some rubbing alcohol into a small container – you’ll need this later to smooth out the fillet. Make sure you use good hand protection while working with epoxy to mitigate any health risk with this material. Vinyl gloves are best. Mix up a quantity of 5 minute epoxy and lay it into the taped fillet area. Using a gloved finger, carefully draw it along the fillet area to remove the excess epoxy and to begin the forming process. Don’t worry about making a complete pass along the fillet at this time; you may find, depending on the quantity of epoxy you have in the fillet, that you need to stop part way along and remove the excess from your finger. Have a sheet of paper towel on hand to keep you gloved finger clean. After you’ve made a complete pass along the fillet, rinse your finger in alcohol to remove any excess epoxy. Then dip it again, daub any excess alcohol away on the paper towel, and then draw your alcohol-dampened finger along the fillet, this time the whole length, being careful to maintain a constant angle between your finger and the fillet. Rinse your finger and repeat. In the case of the Onyx, I was able to make all three passes in under a minute. You don’t want to take too long, as you want to work with the epoxy while it is still fluid. After you’ve made three passes, the fillet should look consistent and should look quite smooth and glassy. Carefully, but quickly, remove the masking tape, being careful not to disturb the still fluid fillet. This step is critical to this method, for if the masking tape is left on too long, the epoxy will begin to set up and there will be a noticeable step in the edge of the epoxy where the edge of the masking tape had been. If you are able to remove the masking tape while the epoxy is still fluid, the edge will still flow out, leaving a virtually seamless transition between the body tube and the fillet. This makes for little or no sanding later during the finishing stages. Photo 4 shows a completed fillet with smooth edges.
Repeat the process for the other fins and you’ll have a set of very professional looking fillets ready for primer and paint. Photo 5 shows the primed and painted fillets on my Onyx.
|